Hi Friends!
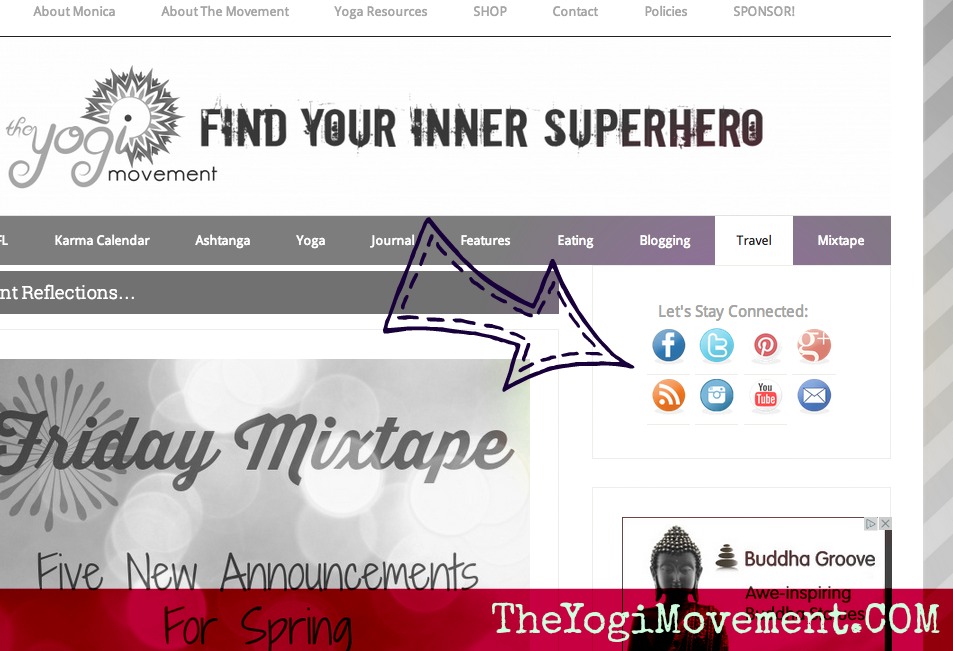
It’s essential to have all of your social media icons on your blog so your readers can stay up to date with all of your posts and updates. Chances are, each one of your readers is connected to at least one (but probably many) social media networks, so it’s great to post updates about what you’re blogging about to them throughout the day! It’s also a great way to welcome your readers into your life by showing them how you live day to day. If you have your social media icons in a noticeable place on your blog, your readers can connect with you on the ones they frequent the most.
When I first started blogging I used a plugin, but then as I would check out other blogs, I would see all of these cute icons on their pages. I wanted to change mine to something more creative that matched the look of my blog. I started to research and found that a lot of bloggers design and give away their social media icons for free. Some ask you to pay of course, but I’m all about the free stuff!
Plugins weigh down your site and makes it go slower, which can be annoying, so I will always take the route of not installing a plugin if I can do something on my own.
You can scroll down for a video tutorial about how to install the icons on your blog, or go through the step by step written instructions. Either way, if you don’t understand something, hopefully you’ll find the answer in the video or the blog, but you can always email me
PIN IT
Importing your own social media icons using code is easy, and you can either delete your current plugin or not install a plugin at all!
This is my home page using a plugin called Crafty Social Buttons. They’re good looking and have a few different options, but still limiting. Plus, it’s still a plugin weighing down my site.
How To Install Social Media Icons Without A Plugin In 6 Steps
1. Search for FREE Social Media Icons. I use MaxButtons.com . You can also do a Google Image Search for “Free Social Media Icons”, “Vectors” or “Buttons”.
- Search for icons that have everything you need. Sometimes a designer doesn’t create all of them, so make sure you grab one that has all of the networks you use. Most designers create a ‘blank’ button so you can create the logo yourself if they don’t have it. That’s also something to look for and consider when choosing your icons.
- You’re going to find so many cool options it’s going to be tough to choose! Find the one you love, click on it and follow the instructions on how to download those icons.
- They’re going to download as a .zip file. This will download into your downloads folder (unless you’ve changed your settings). You’re going to have to unzip the file by clicking on it ,and then drag the folder from the downloads folder to your Desktop.
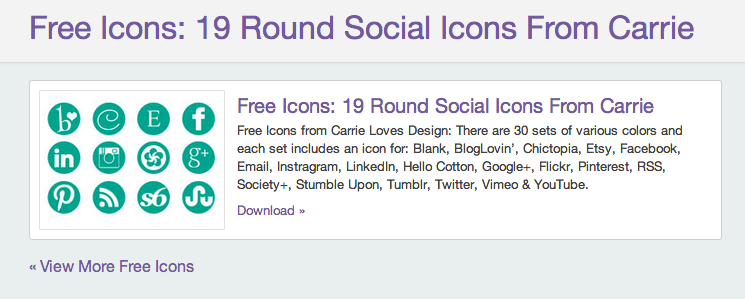
I chose these, which led me to CarrieLoves.com
She provided them in three different pixel sizes and 30 or so different colors. I went with Tangerine
2. Upload Icons Into Your WordPress Media Library
- Go into your dashboard
- Click on Media, and then Add New
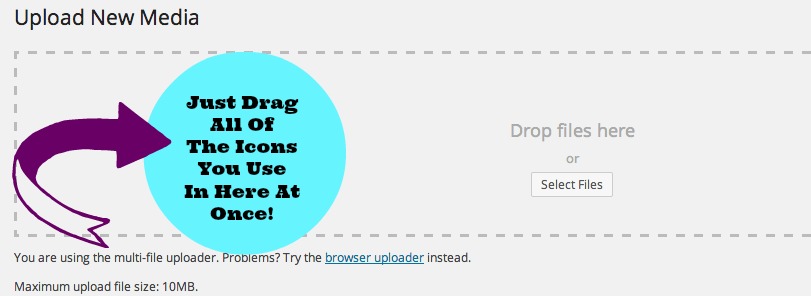
- You should come up with the picture below
- Then, just drag all of the icons you use in that space and they’ll upload pretty fast
3. Grab all of your Social Media URLs.
- Open up a Word Doc or Text File
- Make a list of all of the social media networks you use (Pinterest, Instagram, Google+, Facebook, Twitter, Tumbler, etc…)
- Go to each site and Copy the URL, then paste it next to each site that you listed in the Text or Word Doc. On an Apple; CTRL is the Command key
- CTRL+A = Select All
- CTRL+C = Copy
- CTRL+V = Paste
4. Find Placement on Your Blog For The Icons
- From your Dashboard, choose Appearance —> then Widgets
- Grab the Text Widget and drag it to where you want your Icons to Display.
- I like to display my icons on the top right sidebar.
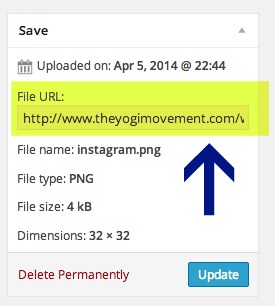
5. Find Your Image URL
- It’s time to install the Icons, so you’re going to need some information from your Library where you uploaded them to.
- Once you open your Library (by going to Dashboard —–> Media —-> Library) you should see them right away because they were the last images uploaded.
- You should be able to just click on the title of the image, or click edit. Then the page opens dedicated to that icon. You’ll see the image url in the right corner.
- You’ll need to grab these one by one, and this is how you’ll be able to connect your Social Media URL with the matching icon.
6. Building The Code (Easy)
- Let’s do this one by one
- Here’s the template:
<a href=”INSERT SOCIAL MEDIA URL“><img src=”INSERT IMAGE URL“></a>
For My Instagram It will look like this (Don’t forget the quotes around each URL):
<a href=”http://instagram.com/monicadawnstone“><img src=<“https://theyogimovement.com/wp-content/uploads/2014/04/instagram.png“></a>
which turns out like this: 
SWEET, RIGHT??
I LOVE WHEN THINGS WORK!
- Just continue to build the code with each Social Media URL that matches the Image Icon URL
- Save & Refresh Your Page!
- You’re Done!
Some Tips & Tricks
1. Height & Width: You can control the width and height if you want them to be smaller or larger. This is 32 pixels, but if I wanted it to be 25 pixels I can add that at the end of the image code. For example, if you wanted them to all fit on one line this would make them smaller, but you can make them larger too. Experiment with different pixel sizes.
Here’s how the CODE would look :
<a href=”http://instagram.com/theyogimovement“><img src=<“https://theyogimovement.com/wp-content/uploads/2014/04/instagram.png”width=”25″height=”25″></a>
Here’s the difference:![]()

2. Centering : Let’s say that you finish building your icons and you want them to look all pretty and centered. SUPER EASY. Once you finish building your code for ALL of your icons, you’ll just need to add something right before the first one, and right after the last one. Here’s what it will look like:
<div align=”center><a href=”ALL OF YOUR SOCIAL MEDIA CODE”</a></div>
YOU’RE DONE & YOU DID AWESOME!
VIDEO TUTORIAL: HOW TO INSTALL SOCIAL MEDIA ICONS ON YOUR WORDPRESS BLOG

Stopping by from Click and Chat link up party. I’m now following you at all your social media! Stop by and say hi to me sometimes @ stuckonacloud.com.. Looking forward to sharing with a new blog friend.. Have a wonderful week!
Tiffany
OMG, Mon, this was soo helpful!! Thank you for all your “techie” help. Check it out, upper right hand corner: http://www.theyogalawyer.com/
This was awesome, thanks! I uploaded the email icon next to my social media icons, can you tell me the code so that I can add my email? Thanks again…it was SO easy.
Hey Libby! For the email code: mailto:genericemail@gmail.com – Does this answer your question? Let me know & if not, I’ll try again! Glad this helped you out!